2022 F150 Tremor Suspension Fitment Confirmed
Posted by Derrick Lovell on
Icon 2.5 CDCV on a.....Tremor?

There’s been a lot of talk circling the Tremor model within the F-150 communities. One question that has been asked a lot lately that many haven’t had an answer to is simply “What suspension does and does not fit on these tremor models?” It seems that many brands are disclosing that their kits are not recommended for the F-150 Tremor. Which led us to ask the question; why? We researched and read through what many have attempted to make work or have confirmed that has fit, and we kept seeing the same few answers: Halolift, Rough Country, or spacer kits. This then led us to wonder about leaf packs. Why is there nothing out there for the F150 models yet? With some research and the right questions with our friends at Icon, we began to wonder if it was possible to fit a 2nd gen Raptor RXT leaf pack on the Tremor. The numbers seemed to add up and they said they were also testing the idea out. So naturally, we at Hotshot Offroad knew we had to take the leap and see if any of this would fit the Tremor model. So began our journey.
**As with any installation that does not have confirmed fitment, we knew we would run into some challenges. We hope to educate and help everyone understand what we found to work but also hopefully help give some encouragement to folks to go ahead and try something new. You just never know the results. Below we will lay out some specifics as well as some details on the install. We will not go through an entire install process as it is generally the same as written in the manufacturer’s instructions. However, what we will do is explain areas that were abnormal to a typical install and our work arounds to make things fit both correctly and safely. Disclaimer: We highly recommend having a second set of hands during this install. Many of the work arounds we had to do truly needed another person. It can always be done solo with the proper tools, but we advise having some help.
Performance Testing
Once we completed the installation, we wasted no time getting the truck on the road and seeing how she drove (after an alignment of course). The initial reaction was impressive. The Icons immediately drove smoother than the stock suspension. A lot smoother. We purposely went over bumps and cracks in the road to see how it handled and truthfully it took on daily roads with ease. We had the front and rears set right in the middle stiffness setting (5) to get a good middle ground feel. After the road test we had to see how it performed on some trails filled with dirt, snow, ice, and deep rivets. Popped the truck into Snow mode and let er’ go. Once again, it performed extremely well. The shocks really helped take on the multi-terrain to allow the drive to seem almost faultless. We did end up adjusting the rear stiffness up some as it did seem to feel a little too soft on the back end. But a simple turn of the dial got it all locked in. Once the trail test was done, the truck was put immediately onto a road trip. Traveling from MT to IA for 3 days of driving through snowstorms, hundreds of miles of ice covered interstate, and then pure sunshine and clear skies. The truck saw it all. Not only was the overall ride extremely comfortable for a 1,400-mile road trip, but the tires we installed performed surprisingly well with the multi terrain conditions. At one-point I90 East was pure ice for nearly 120 miles, but the Goodyear Duratracs handled the ice much better than anticipated.
Vehicle: 2022 F150 Tremor. 401A w/ Torsen Suspension
Shopping list of parts included w/ Install (with direct links to purchase):
- Icon 2.5 CDCV Coilover Kit – 91823C
- Icon 2.5 VS PB CDCV Rear Shocks - 97720CP
- Icon Delta Joint UCA - 98502DJ
- Full Kit - K93115T
- 2nd Gen Raptor Icon Multi Rate Leaf Pack – 198510 x2
- 2nd Gen Raptor Icon Hardware Kit – 95225H
- Timbren SES Bump Stop Kit - FR1504E
- SPC Pinion Angle Shims (may or may not need) - 86255
- Max Trac Drop Shackles – mxt-413710
Tire and Wheel Set up:
- Goodyear Duratrac 285/75/18 (we do not carry tires)
- Method 312 18x9 +18 - mrwMR31289016518
Measurements:
Before
- Drivers Front: 22.5” Hub to Fender
- Drivers Rear: 26 5/8” Hub to Fender
- Passenger Front: 22 ¼" Hub to Fender
- Passenger Rear: 27” Hub to Fender
After CDCV Install
- Drivers Front: 24” Hub to Fender
- Drivers Rear: 27”
- Passenger Front: 24 3/8”
- Passenger Rear: 27”
Installation Snags and Work Arounds
Front Coilovers and UCA’s
We began the installation like normal. Broke down the front end of the truck and removed the front shocks. When installing the front coilovers we ran into our first snag. As is typical for Ford F-150 applications the Icon CDCV bottom of the shock mount was slightly angled. This did not allow us to thread the bolts through due to the limited amount of space and the additional length of the new shocks. Regardless of how much we tried to make this fit, we had no choice but to drop the LCA’s to get everything lined up. Once we got those dropped, we were able to mount up and get everything secured quickly. Next came the UCA’s. This was probably the easiest UCA installation we have ever run into. Ford did a great job with making the bolts that mount through the bushings easily accessible. Be sure to grease both sides of all bushings before installing. This is not something mentioned in the Icon instructions, but doing so but will prevent the dreaded squeaks. We also recommend adjusting your coils before install. The coilovers as configured from Icon only lifted the truck about .5”. We measured the preload to get to our desired length/lift and added about 1” of additional lift from how they came shipped.

Rear
The rear shocks went in without any issues. Easy bolt up install. The only modification that was necessary was trimming the passenger’s side upper shock mount to allow for clearance of the larger body Icon shock. This is explained in the Icon instructions. Once we began the rear leaf pack install is where a few workarounds had to happen. Typically, you can remove and replace one side at a time when swapping your leaf packs. In this case, both sides will need to be removed (or at least the lift blocks removed) before installing the new Raptor leaf packs. The 3” block causes too much binding and shifts the axle too much when attempting to install. If you simply remove one side, support the rear axle with a jack, and then remove the other side; everything can mount up after that. You will also have to cut the front leaf spring bolt on the driver's side. The bolt is too close to the fuel tank to be removed, but this is a known issue and Icon does supply a replacement bolt with this leaf kit. Once those steps are done, it's all line and bolt up.
The drop shackles were a necessity to make this work. Without them the RXT leaf packs did not have clearance with the OEM exhaust system. There are plenty of options out there, but we chose the Maxtrac 1” (box states 1 ¼) shackles simply due to availability at the time. We started with getting those into place and then working our way onto front of the leaf pack.

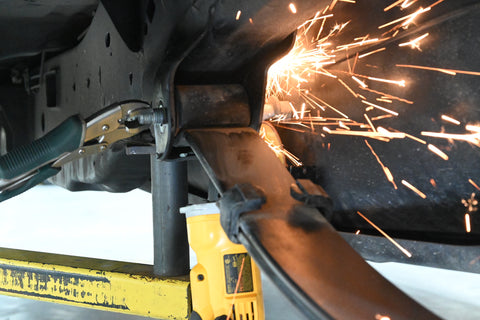
Crash bars
As many of you have probably heard, the crash bars on these trucks must be replaced or removed to run larger tires. Our tires are just under 35” but would have still rubbed them on crank. The rear bars must be cut. The bolts holding them together do come out fairly easily; but the bar is too long and close to the body of the truck and cannot be slid out. The fronts have a couple of options. They can be cut, or unbolted and removed. To remove them without cutting you will need to remove or at least loosen up the front bumper in order to work the bars out. We chose to cut ours, but due to clearances found that we would have probably been time ahead had we pulled the bumper. Either way it works but choose what works best for you.

Overall, this installation is not terribly difficult. We had to spend some time finding work-rounds to make sure things fit properly but now that it's been done, we know the install time could be cut down significantly. Most should expect this to be a full weekend installation depending on how many hours you want to put in. We are very happy with this set up and love that these suspension kits do indeed fit the tremors with just a little extra elbow grease and time. For those not interested in swapping the leaf packs then installation is even easier. Simple bolt on install. After completing this install though, it has given us a lot more confidence that kits that fit the other F150 models will bolt up to the Tremors as well. You will not get quite as much lift in the front as you would on other trim levels; but you can still get pretty close to being leveled while improving your overall ride quality and comfort (as well as performance if you like hitting the trails). For those that do not plan to run larger then stock wheels and tires, and you do not plan to touch your rear leaf packs; you can simply do a bolt on install. No cutting needed.
We hope this helps some of you out and we will continue to update you all with any adjustments and changes we make to the Tremor. And please reach out if you have any questions on getting your own Tremor set up done!
Follow our build on our Instagram!
@hotshot_tremor